User Manual
This is the GitX user's manual. This document tries to explain the most common used features and explains the concepts that might be confusing if you've never used a git GUI.
Disclaimer
GitX aims to be a graphical wrapper around the most-frequently used git-commands, enabling you to satisfy your daily git needs in one consistent program. GitX doesn't aspire to be a complete interface for the wide variety of git command-line programs with their ever-growing number of options. It's also no easy way to learn git. A sound understanding of how git stores data, how it works on that data and how to recover from (accidental) deletion of branches and commits will not only help you with git but will also enable you to learn GitX with greater confidence and speed. Since GitX is far from complete you'll probably still have to use it in conjunction with the command-line git for more complex tasks, such as merging or performing remote operations.
Overview
When you open GitX for the first time, you will be greeted by an open-dialog. In this dialog, you should select the Git
repository you want to open. You can select either a directory containing a .git directory, or a .git directory itself.
After doing this, you will be greeted by the default GitX view, which is the history-view. The history-view consists of
two main parts. The top part is used for displaying commits on branches and the bottom-view displays details about the
selected commit. The window-title will always show you the currently checked-out branch (or indicate a detached HEAD).
 The menu contains buttons to switch between history/commit-view, a selector for specifying which branch to show and an
'Add branch' button. Branches can be checked-out and deleted within GitX by right-clicking their colored bubbles the
commit-list.
The menu contains buttons to switch between history/commit-view, a selector for specifying which branch to show and an
'Add branch' button. Branches can be checked-out and deleted within GitX by right-clicking their colored bubbles the
commit-list.
You can double-click the divider between these areas to collapse the smaller-one or you can use Command-Shift-Up and Command-Shift-Down to do so.
The commit list
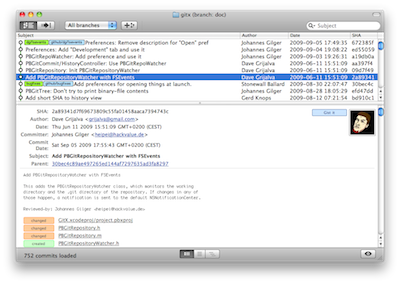 On the left side in the commit list you can see the branch lines. These show you how your history has diverged and
merged. As newer commits are on top, two lines joining each other from the bottom is a merge. This way you see which
branches were merged in without any effort.
On the left side in the commit list you can see the branch lines. These show you how your history has diverged and
merged. As newer commits are on top, two lines joining each other from the bottom is a merge. This way you see which
branches were merged in without any effort.
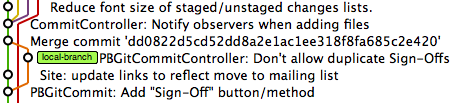 On some commits, to the right of the branch lines you will find commit labels. These indicate references to these
commits, for example branch heads and remote heads. Green labels indicate local branches. Blue labels indicate
remote branches (it will be in the form of remote/branch). Yellow labels indicate tags. The orange label indicates
the currently checked-out branch.
On some commits, to the right of the branch lines you will find commit labels. These indicate references to these
commits, for example branch heads and remote heads. Green labels indicate local branches. Blue labels indicate
remote branches (it will be in the form of remote/branch). Yellow labels indicate tags. The orange label indicates
the currently checked-out branch.
There are four columns, the first showing the commit subject (which is the top line of your commit message), the second the author name, the third the commit date and the last showing the abbreviated SHA of the commit. You can sort on any of these columns. However, if you sort the branch lines will disappear. Repeatedly clicking the row will revert the ordering and the original order will be restored, including the branch lines.
In the top right you will also find the search bar. Here you can search on subject, author or SHA. If you do this, the branch lines will also disappear.
The detail view
 Below the list of commits rests the detail view which shows information about the currently selected commit. The detail
view can switch between three different ways of displaying the commit using the three buttoms at the bottom. The first
tab shows information about the current commit in a nice markup and will probably be the view you use most. In this
mode, you can see a pretty diff of the commit, and information such as the parent SHA and the author's email address.
Below the list of commits rests the detail view which shows information about the currently selected commit. The detail
view can switch between three different ways of displaying the commit using the three buttoms at the bottom. The first
tab shows information about the current commit in a nice markup and will probably be the view you use most. In this
mode, you can see a pretty diff of the commit, and information such as the parent SHA and the author's email address.
 The view is pretty much self-explanatory but
it does contain some features which might not be obvious. You can right-click the refs and files to get a context-menu.
The "Gist it" buton will upload the current patch to gist.github.com. This will use
your
The view is pretty much self-explanatory but
it does contain some features which might not be obvious. You can right-click the refs and files to get a context-menu.
The "Gist it" buton will upload the current patch to gist.github.com. This will use
your github.user and github.token git-config options if those are set. Otherwise it will create an anonymous gist.
Have a look at the Preferences to set options for Gisting your patches.
The second detailed view will simply show the raw content of the commit, much like git show --pretty=raw would.
The third detailed view is more interesting: It allows you to browse your history in tree-view and export files/trees from certain commits. To do so, select the commit and then simply drag-and-drop the wanted dir/files from the tree to a folder in the Finder. This is also where the Quicklook button in the bottom right comes in: pressing it while selecting a file that can be QuickLooked (an image, for example), will display it in the same way as the Finder's quicklook. GitX even imitates this behaviour by allowing you to press space to quicklook a file.
Committing
 The commit-interface of GitX also consists of
two parts. The top part will show the diff of the currently selected file. The bottom part is a bit more complex.
The commit-interface of GitX also consists of
two parts. The top part will show the diff of the currently selected file. The bottom part is a bit more complex.
In the left list you will see files that are unstaged. If you are already used to Git's terminology, you will know what this means. These are the changes that have not been added to the index, and thus also will not be committed.
The rightmost part shows the staged changes. These will be committed in the next commit.
It is possible to have a filename in both lists at the same time. In that case, there are some changes in the file that will be committed, and some that have been left out. Clicking on their name will show you what the difference is in the top pane.
To stage a file, double-click its icon. This will move the file from the left to the right. In the same way, you can unstage changes by double clicking on the name in the right pane. If you prefer, you can also drag and drop the files from one list to the other. You can also select multiple files, and then drag them to the other side all at once.
Every file has an icon associated with it. This shows the status of that file:
- A green icon indicates there a changes to a file that is already tracked.
- A white icon indicates a file that is not tracked by Git, but also not ignored.
- A red icon indicates a file that has been deleted.
Partial staging
Sometimes you have made more than one change to a file, but would still prefer to create more than one git commit; the more specific the commits, the better, right? This is where hunk and line-wise staging comes in. Next to each specific change in a file, called a hunk, you will see a blue 'Stage' button. If you click on this button, only those specific changes will be staged. Clicking the 'Discard' button will irreversibly throw away this change, so use it with care! The confirmation can be silenced using Alt-Click.
GitX 0.7 introduced a new way of staging lines: Simply drag-select a few of the lines you want to stage/unstage and a 'Stage lines' button will appear next to it. This allows for much finer granularity than the hunks determined by diff. Double-clicking a changed line selects the entire surrounding block of changes. Selecting lines across hunks is not possible.
Committing
Once you have staged all your changes, you can commit them. Supply a commit message in the center pane, but remember to
use proper commit messages: the first line should be a short description of what you have changed followed by an empty
line and a longer description. Make sure the subject of your commit is short enough to fit in GitX's history view!
Pressing the commit button will hopefully convey to you that the commit was successful, and also give you the commit
hash.
The 'Amend' checkbox represents git commit --amend: It enables you to amend the commit on the tip of the current
branch. Checking 'Amend' will give you the commit-message of mentioned commit and also will display all of the changes
the commit introduced as staged in the right-hand pane. You may then stage/unstage further changes, change the
commit-message and hit 'Commit'.
The 'Sign-Off' button adds your signature to the commit which is common practice in a lot of Open-Source projects.
Advance GitX usage
While GitX can be used just fine without ever touching the terminal, some of it's power can currently only be used through the command line utility.
You can install this utility by choosing "Enable Terminal Usage…" from GitX's menu. This will ask you if GitX is allowed to install the gitx utility in /usr/local/bin. After you have done this, you can use gitx from the terminal in any Git repository!
To become familiar with this utility, you can read it's short help message:
Tirana:UserManual pieter$ gitx --help
Usage: gitx --help
   or: gitx (--commit|-h)
   or: gitx <revlist options>

    -h, --help          print this help
    --commit, -c        start GitX in commit mode

RevList options
    See 'man git-log' and 'man git-rev-list' for options you can pass to gitx

    --all                  show all branches
    <branch>               show specific branch
     -- <path>             show commits touching paths
As you can see already, gitx has some useful options. To quickly start committing, use gitx -c.
However, to really make use of all the options, you should read the git-log and git-rev-list man-pages. Gitx takes most of the commands that normal git utilities also take.
For example, if you want to show commits that change lines with the word 'cool' in it, you can use:
gitx -Scool
and to see commands that touch only files in the "Documentation" directory, you can use
gitx -- Documentation
You can also specify which branches gitx should display, for example:
gitx commit_view log_options --grep="fix" --author=Pieter
will show all commits in the commit_view and log_options branches that have the word 'fix' in their commit message and which are committed by Pieter.
If you have a lot of commits, you can choose to limit the output. For example,
gitx -1000
will only show the first 1000 commits. Limiting commits can be useful in other contexts too. For example, if you want to know what you have committed that isn't on the remote yet, you can use
gitx origin/master..
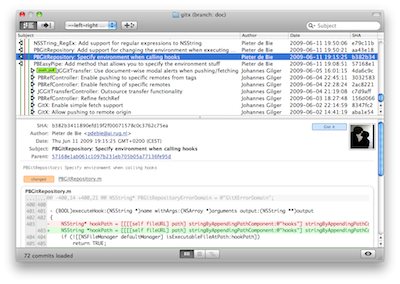
If there are changes both on a remote and on your local side, you can show them at once with the symmetric set difference:
gitx --left-right origin/master...HEAD
will show commits that are only on your side OR only on the remote side. The --left-right options does some other magic: instead of the usual circles GitX uses in the branch lines, it will now use an arrow pointing left for commits only on the left side (that is, in origin/master), and an arrow to the right for commits only on the right side. For example, when I issued the same command on this repository, I got:
You can also pipe any command that produces a diff to GitX to see its changes. For example, to compare version 0.5 and version 0.6 of GitX, you can do the following:
git diff v0.5 v0.6 | gitx